Mapping Section
In this part of the tutorial is explained how to map our car.
In this tutirial is explained a method to map the car faster using a template with some poligons.
Let's see the steps to map the car:
1.
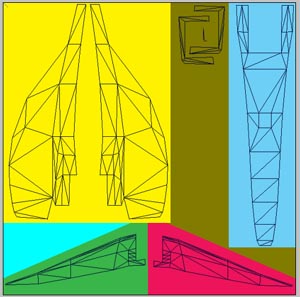
Make two screen shoots of the car like this: (one from top view, and the other from
side view):

Side view

Top view
2.
Put the diferent parts of the car that you are going to map in
the material (the texture, that have a sise of 1024x 1024 pixels).
For example I map the sidepods, the nose and the
engine on the first tga. You can see it in the next image:

Filling the texture with some parts of the screenshots
We will do the same for the 2nd material, its to say map the side of the nose cone, the front wing...
Finally we can use a similar way to prepare the 3rd material, that we will use to map some
little parts of the car,like car numbers, little wings...
In the following images you can see that in the 3rd material I have put a lot of squares. It's to map
the small details of the car. In this way it's very simple to map the details.

We will use these squares to map the different parts of the car. The following image shows
it:

3.
Now,in the tga1 and tga2 make some poligons whit different colors to differenciate the
different parts of the car (using as reference the different parts of the car that we have
copied and pasted in the second step). These poligons will
be our reference when we map the car in ZModeler.
You can use any kind of poligons that adjust at the piece of the car
that you are going to map.

4.
Start to map the car in ZModeler (a good tutorial is the Mapping
cars for GP4 by Auradrummer, you can donwload it on gpxcarpainting).
First of all I have to tell you that you have to map faces, so we will work on faces level.
So to map a group of faces, select the faces on faces level (if these faces belongs to different
objects, remember the ZModeler section of this tutorial that says that to select faces or vertices
of different objects you have to select the desired objects on objects level, then activate
SEL mode and switch to faces or vertices level, click on the selection and now you can select
the desired vertices or faces.) and activate SEL mode.
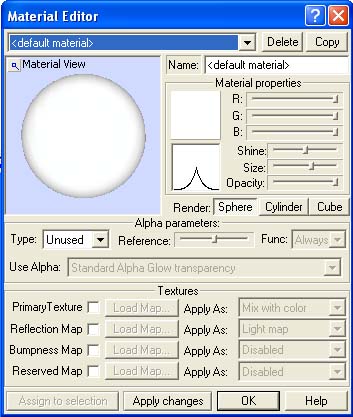
The next step is assign a material to our selected faces (remember to activate SEL mode), so go to the
material editor and assign the material by clicking on the Assign to Selection button.
Aftet that, you have to assign UV to your selected faces (remember to activate SEL mode).
To do this, go to Surface -> Mapping -> AssignUV and click on the desired view.
Remember also that if you want to remap a mapped area first you have to delete the
current UV mapping of the desired faces. To do this: select the faces on faces level
go to Surface -> Mapping -> ResetUV
(remember to activate SEL mode) and click on the selection.
The next step is assing UV to
the selected faces as usual.
Now you can see in the UVMapper view the map of your selected faces.
Remember that to scale it you sholud use the numeric box #1.
Put in this box the number that you want to
reduce the sisze of the texture. The best is reduce the 60% (thanks to Bojan Tarticchio
to tell it to me). So put 60 in this box and drag with the mouse as usual, it'll scale
down exactly 60% in steps. Reduce all the mapped objects to 60% using this method.

The following image shows the process of map a piece of the car: select a group of faces,
map the faces (by clicking on the top view), scale the mapped area with numeric box #1
and finally see in 3D view the
mapped area on the car.

5.
You can see inmediately the parts that are mapped because they are
painted in different colors.
6.
Finally, we are going to show all mapped areas with each material
(you can read also the tutorial How to find out the mapping of a gp4 car
by Max Downforce, you can find it on gpxcarpainting.
To show the mapping of the car:
- Select all the object of the car in objects level.
- Switch on the SEL mode and go to faces level, right click on the car.
- Go to Select ->By Material and select the material that you want to get the mapping,
for example the vte_1.tga. You will see that the parts of the car that belong to
this material are selected.
- Now, go to Surface -> Mapping -> AssignUV (You should know that if you AssingUV to a face
that is already mapped, ZModeler doesn't assign a new UV, it just show the current UV in
the UVMapper.)
- Finally go to the UVMapper view and you will see the UVMapping of your selected material:

To finish we have to make a hi-res screenshoot of the wireframe in order to paint the car.
To make the screenshoot, first make the UVMapper in full view by pressing "f" on your keyboard.
Then make the UVmapped area as big as you can. Take an screenshot. Go to your favourite paint program
and paste the screenshot. With the rectangular seleccting tool select the inner area of the
UVMapped area (I'mean, that you have not to select the grey line).
With the magic eraser tool and wiht out antialiasing delete all the background but not the wireframe.
Change the image size to 1024x1024. Finally paint four little withe pixels at the corners
of the image (it's to avoid problems if you copy and paste the image, remember that when you select a
image with some transperencies, photoshop automatically adjust the selection to the painted area)
and save it.
Congratulations, you have made the first steep to make a good template to paint the car.
On point 13 it's explained how to make a nice template.
7.
If when you find out the mapping of the car you see that is incorrect (for example
one surface is in a brong place), no worry, you can solve it.
Let's see how to solve it, in the following image we can see that the engine surface is
displaced.

To solve this, switch to vertex level and select all the vertex of these surface:

Now, pres the SEL button on to activate the multiple selection and Modify -> Move. Then
place the object on the desired poligon: finaly you will have the correct mapping:
Moreover you can do other things when you have selected all the vertex of a surface:
scale it, rotate, mirror, reorient... So if we made a mistake when we map the car there is
no probem because we can solve it using the method that I explained in this point.
8.
Sometimes is good to write something when in the texture that we are mapping. Then you
can see if you are mapping in the correct position or not. For example the engine. The image
is self explanatory.

You can use any kind of poligons that adjust at the piece of the car
that you are going to map.
9.
Another surfaces like the suspensions, the inferior part of the car... are mapped
whit carbone fribre. To map these we are going to use a method called Tile textures.
Whe are going to use a material that is all black with a grey lines.
Select the surfaces that you would map with carbone fibre,

then assing the material to the selection and go to
Surface -> Mapping -> AsingUV and clic on the view that the surfaces are
more visible (for example tho map the bottom of the car click in the top view,
or to map the rear fins click on the right or left wiew).
Then in the UV Mapper view you will see the surfaces that you had selected, now
make them larger with the scale tool (no mather if the objects are outside of the
texture), yo will see something like this:

Finaly in the 3D view you will see:

Now you can scale the surface mapped more or less and you will see that the gray lines
are closer or they are farther. So you need to experiment and make the size of the mapped
area that make in 3D view a better presentation.
Finally do the same for all the surfaces that have the texture carbone fibre.
Another and very useful mapping method to map carbon fibre parts of the car (thanks to Bojan
Tarticchio to tell this method to us on gpxcarpainting forum.)
First of all make a pattern on your texture with black and gray lines (1 pixel with every line) and
very wide (about 1024 pixels).


Now select the part of the car that you will assing the carbone fibre texture,
assign the material and UV.

Scale the mapped object to 40% by enering 60 on numeric box#1.

Place axis ( X ) on the center of the front wing on the UVMapper view by putting over it the mouse and
clicking on the keyboard " . ". Now, rotate the object 45ş using numeric bar#1.

Move the object to the center of the black part of the texture.

Finally, place axis ( X ) on the center of the front wing on the UVMapper
view.
Scale in vertical axis (select the V axis mode) and scale to fit it perfectly on the texture:

Finally the result is a nice mapped part of the car wiht a good carbone fibre texture:

This method is very useful because we don't use much space on the texture and we don't need
to add a new texture for the carbone fibre.
10.
The next etep is do the same for all the car, it's to say finish to map all the car.
11.
To map more easy you con copy in a paper with a pen the poligons that you have
made in the 3r step. And now you can with a pen draw the parts of the car that
you are mapping on the texture and write the name in order to not have problems
later (for example if we don't draw the mapped parts of the car we can
map in the same poligon two parts of the car and this is a problem that can be
solvet by writing the mapped parts in a paper with a pen).
12.
The final step it's map the numbers of the car2. To do this save to copies of your car: car1 and car2.
Now remap the numbers on the car2 and save the changes. So in this final step we have two cars:
car1 and car2.
13.
I will explain the basic steps to create o good template.
(the explanation is to adobe photoshop, but to other
programs like the gimp, paint shop pro... is the same, but
the tools are located in different places).
First of all we have the wireframe in our texture (to get the wireframe of the texture see point 6)
, it's something like this:
Now paint the exterior part of the wireframe
of your tga in a color that you won't use for the car, for example
this light green.

After that select wiht Magic Wand Tool the exterior part of the wireframe
of your tga.

The second step is create a new layer with the selection, to do this:
right click and select Layer via cut in the menu that will appear.

Go to the new layer and select the green part, now invert the selection
in order to select the surfaces of the car (Right click and select Select
inverse in the meny that will appear).

Now expand the selection to avoid some problems. For example 3 pixels.


The final step is paint the surfaces of the car with the desired color, it's to
say, paint the selection.
I have paint it blue.
The result is a nice template:

And doing the same for all the textures the result is a nice template.

The next step is paint the car using this template. Remember to add some texture shading,
car lines...
By the way, to get a very precise template you can use a ZModeler plug-ins that allows you to
export the template in eps format. And it's very preceise.
You can download it on:
ZModeler plug-ins
Hope that this can help you.
NOTE: map lod 4
Remember to map the car lod_4:

This shape is very low resolution, to map it only map the correct color on the car: the color of
the nose, the front wing, the rear wing, the sidepods... It's to see the car in the mirrors (you can
see the lod_4 in the mirrors). So remember to remap the lod_4 and change the name of the materials:
use the same materials as in the lod_0 (you can use less materials for example VTE_1.TGA and VTE_2.TGA,
but the same name for the used materials).
I always map the lod 4 when the car is finished. You can see in the next image that the map is awful,
and the car_lod_4 needs to be remaped:

For example I will explain how to map the front wing. Select the front wing (on faces level), activate SEL
mode, go to surface -> mapping -> Reset UV, and then go to surface -> mapping -> Assign UV and click on
the top view. Then you will see:

The next steep is adjust the mapping at the texture. The following image shows this:

And on 3D view you can see the result of our map-change:

If we remap all the car (it takes a few time) you can get a nice low-res car:

It's to say, we will see the correct colors of our car in the mirrors.
Some mapings tips
First of all thanks to Bojan Tarticchio to tell this method to us on gpxcarpainting forum.
This method is very useful for contiguos pieces on our car, it's to say, for the car body parts.
You don't need to make this for wings and other parts of the car.
To aply this method, first select a pice of our car, assign a material and assing UV. Now Scale it to 40% (you must write
60 on the numeric box#1):

Finally move this object to the center of the mapping area.
Do the same for the other parts of the car.
But, for example some surfaces need to be rotated 90ş.
To make this precise rotation use the numeric box#1, and move it to the right of the maping area:

Doing the same for the other part of the car, and moving it to the left of the mapping area we have all the parts
of the car mapped. To see all the parts of this material mapped, select all the objects of the car, activate SEL mode,
switch to faces level, go to select by material and select the material that you have assigned at the mapped parts
of the car. Finally go to Surface -> Mapping -> Assign UV and click in any view. You will see all the mapped parts
of this material in the UVMapper view (Note that when you select a mapped face and assign UV, you won't delete the
previous mapping, you just will see the previous mapping in the UVMapper view.)
It's to say, we will see in UVMapper view:

Now switch to vertex level, activate SEL mode and go to Select ->Quad. Move the select vertices (all object) to fill
all the texture to left less spaces you can.

Selecting the other parts and moving it we obtain a good maped texture.
The next steep is draw a horizontal line (1 pixel width and non-antialiased), this line is a marker.

The last steep is to align the marker in 3D view by moving the mapped parts (left and right) on the UVMapper view. So select
one mapped part (switch to vertex level, activate SEL mode and go to Select ->Quad) and
move the select vertices (all object)) to fit it perfectly in 3D view.


Finally we can paint some horizontal lines on the nose cone, and we can see on 3d view
that they fit perfecly.


About the materials in a gp4 car
Original materials in a original GP4 car
When you import a GP4 car in ZModeler, in the material editor you can see
(for examples in the original Benetton):
COCKPIT_DAMAGE.TGA
CARLIGHTMAPCH2.TGA
CARLIGHTMAPCH3.TGA
BENETTON_1.TGA
BENETTON_2.TGA
BENETTON_3.TGA
Making changes to these materials
You can cange the names of BENETTON_1.TGA to VTE_1.TGA,
BENETTON_2.TGA to VTE_2.TGA, BENETTON_3.TGA to VTE_3.TGA for example.
Then you can use the car for several slots in GP4. First make sure that
your name isn't used by another car.
Moreover, the textures:CARLIGHTMAPCH2.TGA and CARLIGHTMAPCH3.TGA are very
small, they are used by GP4 but if you delete these when you export the car
they will be created. They aren't asigned to any part of the car.
You can use any material to any object when you map the GP4 car in ZModeler.
And, moreover you can add some new materials as for exemple VTECARPARTS.TGA to
increase the detail level in the car and for example the material used to map the
carbone fibre parts on the car.
In the original GP4 car, the materials z_cockpit_right_mirror and
z_cockpit_left_mirror are assigned to the material COCKPIT_DAMAGE.TGA
to get reflections when you import the car in the game you need to asign these
material to these objects, if you don't do this the mirrors won't reflect nothing.
The mapping of these two objects are shown in the image:

Moreover, the z_cockpit_visor must be mapped in the material COCKPIT_DAMAGE.TGA
because this object have a trasparency in the game, the following image shows it:

The other z-object is z_cockpit_interior, but you can map it in the BENETTON_1.TGA or
other material, it doesn't matter.
I think that is a goog method because when you modify a part of the
car, you will have the necessary space to map the new part.
But in the other hand, you will leave some space without any use.
Please e-mail me and make suggestions to improve the method.
vtemarticent AT hotmail DOT com
Enjoy desgining F1 cars.
And remember to read all the tutorials in the
gpxcarpainting web site
and the
Zmodeler web site
.
You will find a lot of good tutorials and you will learn a lot of new things.
Vicente Martí
Vicente Martí home page