Web Development
Client Side
Bootstrap
Óscar Belmonte Fernández
Universitat Jaume I
Introduction
To create the layout of a web page is one of the most time consuming tasks in web development.
This task is typically done styling the content by means of css stylesheets and javascript.
Bootstrap provides us with lots of pre-defined css classes to create the layout of a web page, and javascript code to add interactivity to the visual components, among other things.
Moreover, it provide us with a full set of components (buttons, modal windows, and so on) to create the Graphical User Interface (GUI) of our web page.
Let's see how it works!
Content
What is Bootstrap?

Bootstrap is the most popular HTML, CSS, and JS framework for developing responsive, mobile first projects on the web.
Bootstrap provides us with a scaffolding for creating our static content.
Creating our first project with npm
$npm init
This utility will walk you through creating a package.json file.
It only covers the most common items, and tries to guess sensible defaults.

See `npm help json` for definitive documentation on these fields
and exactly what they do.

Use `npm install <pkg> --save` afterwards to install a package and
save it as a dependency in the package.json file.

Press ^C at any time to quit.
name: (first_project)
version: (1.0.0)
description: My first project using npm.
entry point: (index.js) index.html
test command:
git repository:
keywords: npm bootstrap
author: Óscar Belmonte Fernández
license: (ISC)
About to write to /Users/oscar/Oscar/Oscar/Docencia/Asignaturas/Curso2016-2017/ErasmusMundus/Pruebas/first_project/package.json:

{
  "name": "first_project",
  "version": "1.0.0",
  "description": "My first project using npm.",
  "main": "index.html",
  "scripts": {
    "test": "echo \"Error: no test specified\" && exit 1"
  },
  "keywords": [
    "npm",
    "bootstrap"
  ],
  "author": "Óscar Belmonte Fernández",
  "license": "ISC"
}


Is this ok? (yes)
First, lets add jquery, because Bootstrap depends on it:
npm install jquery --save
first_project@1.0.0 /Users/oscar/Oscar/Oscar/Docencia/Asignaturas/Curso2016-2017/ErasmusMundus/Pruebas/first_project
└── jquery@3.1.1

npm WARN first_project@1.0.0 No repository field.
Now, lets add Bootstrap as a dependency:
npm install bootstrap --save
first_project@1.0.0 /Users/oscar/Oscar/Oscar/Docencia/Asignaturas/Curso2016-2017/ErasmusMundus/Pruebas/first_project
└── bootstrap@3.3.7

npm WARN first_project@1.0.0 No repository field.
Lets review our package.json file:
{
  "name": "first_project",
  "version": "1.0.0",
  "description": "My first project using npm.",
  "main": "index.html",
  "scripts": {
    "test": "echo \"Error: no test specified\" && exit 1"
  },
  "keywords": [
    "npm",
    "bootstrap"
  ],
  "author": "Óscar Belmonte Fernández",
  "license": "ISC",
  "dependencies": {
    "jquery": "^3.1.1",
    "bootstrap": "^3.3.7"
  }
}
Note that bootstrap appears as a dependency in our project.
Creating our first Bootstrap Web page
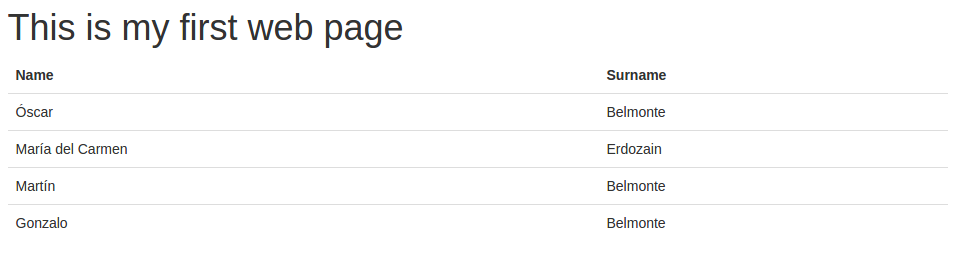
Let's create our first static web page with standard HTML. Create a new file (example: index.html) with the following content:
<!doctype html>
<html lang="en">
<head>
    <meta charset="utf-8">
    <meta http-equiv="X-UA-Compatible" content="IE=edge">
    <meta name="viewport" content="width=device-width, initial-scale=1">
    <title>My first web page</title>
</head>
<body>
    <h1>This is my first web page</h1>
    <table>
        <thead>
            <tr><td><strong>Name</strong></td><td><strong>Surname</strong></td></tr>
        </thead>
        <tbody>
            <tr><td>Óscar</td><td>Belmonte</td></tr>
            <tr><td>María del Carmen</td><td>Erdozain</td></tr>
            <tr><td>Martín</td><td>Belmonte</td></tr>
            <tr><td>Gonzalo</td><td>Belmonte</td></tr>
        </tbody>
    </table>
</body>
</html>
And this is the result:

Let's add Bootstrap style in the title section:
<title>My first web page</title>
    ...
    <link href="{path}/node_modules/bootstrap/dist/css/bootstrap.css" rel="stylesheet">
</head>
Where {path} is your relative path to the node_modules folder.
And some div elements around the whole page:
<body>
    <div class="container"> <!-- Note the container class -->
        <div class="starter-template"> <!-- Note the starter-template class -->
            <h1>This is my first web page</h1>
            <table class="table table-hover"> <!-- Note the table and table-hover classes -->
                    ...
            </table>
        </div>
    </div>
</body>
Now, it must look like:
<!doctype html>
<html lang="en">
<head>
    <meta charset="utf-8">
    <meta http-equiv="X-UA-Compatible" content="IE=edge">
    <meta name="viewport" content="width=device-width, initial-scale=1">
    <title>My first web page</title>
    <link href="{path}/node_modules/bootstrap/dist/css/bootstrap.css" rel="stylesheet">
</head>
<body>
    <div class="container">
        <div class="starter-template">
            <h1>This is my first web page</h1>
            <table class="table table-hover">
                <thead>
                    <tr><td><strong>Name</strong></td><td><strong>Surname</strong></td></tr>
                </thead>
                <tbody>
                    <tr><td>Óscar</td><td>Belmonte</td></tr>
                    <tr><td>María del Carmen</td><td>Erdozain</td></tr>
                    <tr><td>Martín</td><td>Belmonte</td></tr>
                    <tr><td>Gonzalo</td><td>Belmonte</td></tr>
                </tbody>
            </table>
        </div>
    </div>
</body>
</html>
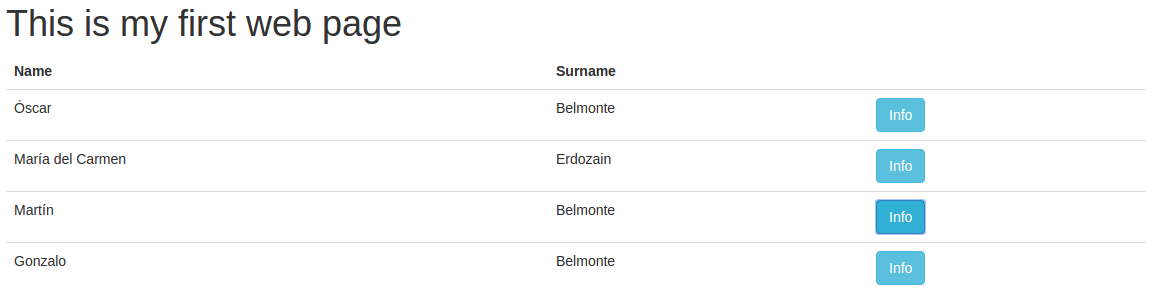
Finally, This is the result of applying the Bootstrap style:
Refactoring
A key point in the development process is to refactor your code frequently.
Refactor means to re-write your code improving its structure and readability.
In this first example, refactor means, first af all separation of concerns.
At this point, we are mixing the data itself with the way we present it: The content of the table is inside the table. This is ok for static content, but we are learning to develop web applications and they are always dinamic.
Let's start with separation of concerns.
First things first, lets remove all data in the table:
<table class="table table-hover">
    <thead>
        <tr><td><strong>Name</strong></td><td><strong>Surname</strong></td></tr>
    </thead>
    <tbody id="peopleBody">
      <tr>
        <td>
          <script>getData();</script>
        </td>
      </tr>
    </tbody>
</table>
Note that we have added an id to the table body.
Let's move the data to a javascript array. So, let's create a new file js/dataSource.js, an type in:
var people = [
    {
        name:"Oscar",
        surname:"Belmonte"
    },
    {
        name:"María del Carmen",
        surname:"Erdozain"
    },
    {
        name:"Martín",
        surname:"Belmonte"
    },
    {
        name:"Gonzalo",
        surname:"Belmonte"
    }
]
Now, let's define, in the same javascript file, a function which will include these data in the web page:
var getData = function() {
    var text = "";
    for(i = 0; i < people.length; i++) {
        text += "<tr><td>" + people[i].name + "</td><td>" + people[i].surname + "</td><td></td></tr>";
    }
    document.getElementById("peopleBody").innerHTML = text;
}
Note that we are updating the HTML document.
Re-load and you will see the same web page as before:
But now, the data we are presenting it's separated from the way we are presenting it. That's very good.
Adding other elements
Bootstarp provides lots of different elements to be added to our web pages.
To start using them, we must include the following scripts in the web page header:
<script src="{path}/node_modules/jquery/dist/jquery.js"></script>
<script src="{path}/node_modules/bootstrap/dist/js/bootstrap.js"></script>
Before our own javascript file.
Let's first start with buttons:
<td><button type="button" class="btn btn-info">Info</button></td>
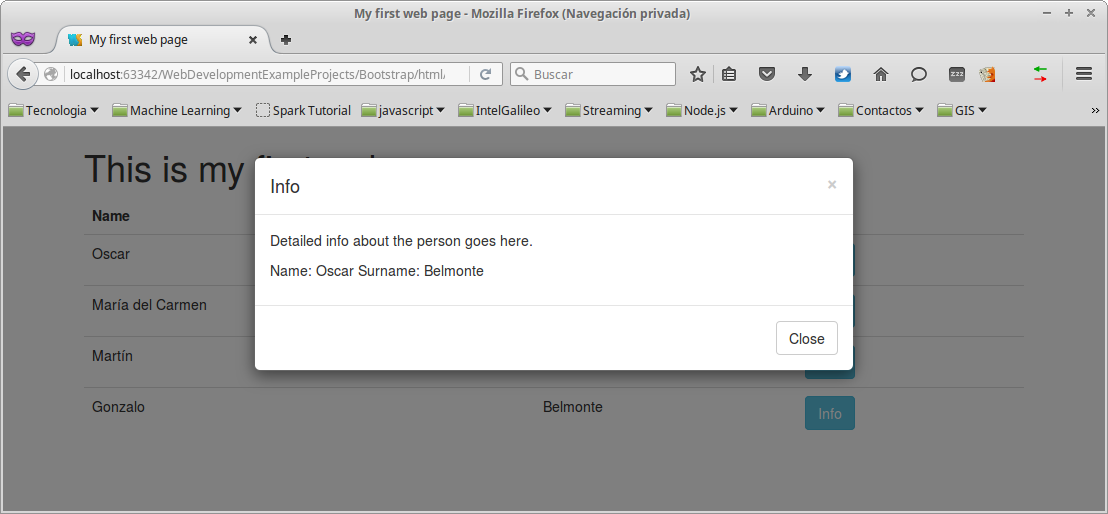
The buttons work, but they do nothing useful right now. It would be fancy if we can get for each person his/her detailed information by pressing each Info button.
For doint that, let's use a Modal window. Note the id name and surname:
<!-- Modal -->
<div class="modal fade" id="myModal" tabindex="-1" role="dialog" aria-labelledby="myModalLabel">
<div class="modal-dialog" role="document">
<div class="modal-content">
<div class="modal-header">
<button type="button" class="close" data-dismiss="modal" aria-label="Close"><span aria-hidden="true">×</span></button>
<h4 class="modal-title" id="myModalLabel">Info</h4>
</div>
<div class="modal-body">
<p>Detailed info about the person goes here.</p>
<p>Name: <span id="name"></span> Surname: <span id="surname"></span></p>
</div>
<div class="modal-footer">
<button type="button" class="btn btn-default" data-dismiss="modal">Close</button>
</div>
</div>
</div>
</div>
Fine, now, let's link each button with the modal window (be careful, this is a long line of code):
text += "<tr><td>" + people[i].name + "</td><td>" + people[i].surname + "</td><td><button type='button' class='btn btn-info' data-toggle='modal' data-target='#myModal' onclick='currentIndex(" + i + ")'>Info</button></td></tr>";
And finally the javascript function that updates the current index for the data (js/dataSource.js):
var currentIndex = function(index) {
    document.getElementById("name").innerHTML = people[index].name;
    document.getElementById("surname").innerHTML = people[index].surname;
}
Done!!! This is how our web applications looks like:
The grid system
The grid system provides us with an easy way to stack the content of a web page:
<div class="container">
    <div class="starter-template">
        <h1>This is my first web page</h1>
        <div class="row" style="border: black dashed">
            <div class="col-md-8" style="border: black solid">
                <table class="table table-hover">
                <thead>
                <tr><td><strong>Name</strong></td><td><strong>Surname</strong></td></tr>
                </thead>
                    <tbody id="peopleBody">
                <script>
                    getData();
                </script>
                </tbody>
                </table>
            </div>
            <div class="col-md-4" style="border: black solid">
                <h2>Detail</h2>
                <p>Name: <span id="name"></span></p>
                <p></p>Surname: <span id="surname"></span></p>
        </div>
        </div>
    </div>
</div>
This is the result:

Summary
We have seen how to easily and quickly create the GUI of our web page application using Bootstrap.
It provide us with a full set of components, and commodity css classes to define the layout of our applications.
We have only seen a sneak peek of all functionality it provides.
Exercises
- Add new fields to the data, the postal address and e-mail for example, and make this information visible only when click the Info button.
- Change the code in a way that the information will be displayed, for the example in the grid system section, when the mouse cursor will be over a table row.
- Try new things on your own.