Web Development
Client Side
AngularJS
Óscar Belmonte Fernández
Universitat Jaume I
Introduction
The Model-View-Controller design pattern is an extensively used pattern when designing applications with a Graphical User Interface (GUI).
The principle underneath is to provide each piece of software with an unique and well define purpose.
AngularJS implements this design patter, so we use it to build our GUI, making use of such a design patter.
AngularJS heavily uses javascript, so anything you already know about javascript can be used in AngularJS.
Content
What is AngularJS?

HTML is great for declaring static documents, but it falters when we try to use it for declaring dynamic views in web-applications. AngularJS lets you extend HTML vocabulary for your application. The resulting environment is extraordinarily expressive, readable, and quick to develop.
AngularJS helps us to create MVC web applications for the client side (browser).
Adding AngularJS module to our web project
We use npm to install AngularJS in our project:
$ npm install angular --save
The dependencies section of our package.js looks like:
"dependencies": {
    "angular": "~1.4.5",
    "bootstrap": "~3.3.5"
}
Now, we are ready to use AngularJS in out project.
Data binding
As a first example on the AngularJS power lets see how data binding works.
<!DOCTYPE html>
<html lang="en" ng-app>
<head>
        <meta charset="utf-8">
        <meta http-equiv="X-UA-Compatible" content="IE=edge">
        <meta name="viewport" content="width=device-width, initial-scale=1">
        <title>My first AngularJS</title>
        <script src="{path}/node_modules/jquery/dist/jquery.js"></script>
        <script src="{path}/node_modules/angular/angular.js"></script>
    </head>
    <body>
    <div>
        <label>Name:</label>
        <input type="text" ng-model="yourName" placeholder="Enter a name here">
        <hr>
        <h1>Hello {{yourName}}!</h1>
    </div>
</body>
</html>
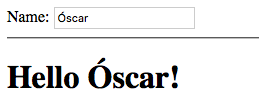
This is the final result:

Anytime you type something in the text input, the text is automatically updated.
Things to note:
<html lang="en" ng-app>
ng-app is an AnglarJS directive. Should be present.
<input type="text" ng-model="yourName" placeholder="Enter a name here">
Another AngularJS directive ng-model says that this is a two binding data model.
<h1>Hello {{yourName}}!</h1>
These double curly braces means that its content will be updated anytime that the data model yourName changes.
Finally, include this in the head element:
<script src="{path}/node_modules/jquery/dist/jquery.js"></script>
<script src="{path}/node_modules/angular/angular.js"></script>
We are including both: jQuery and AngularJS itself.
AngularJS directives
At a high level, directives are markers on a DOM element (such as an attribute, element name, comment or CSS class) that tell AngularJS's HTML compiler ($compile) to attach a specified behavior to that DOM element (e.g. via event listeners), or even to transform the DOM element and its children.
So, we use AngularJS directives to change the DOM... in some way.
Let's see some other AngluarJS directives. Create a new html file with the following content:
<!DOCTYPE html>
<html lang="en" ng-app>
<head>
    <meta charset="utf-8">
    <meta http-equiv="X-UA-Compatible" content="IE=edge">
    <meta name="viewport" content="width=device-width, initial-scale=1">
    <title>Adding two numbers in AngularJS</title>
    <script src="{path}/node_modules/jquery/dist/jquery.min.js"></script>
    <script src="{path}/node_modules/angular/angular.min.js"></script>
</head>
<body>
<div>
    <label>The result of:</label>
    <input type="text" ng-model="one" ng-init="one = 0"> + <input type="text" ng-model="the_other" ng-init="the_other = 0"> is {{one*1 + the_other*1}}
</div>
</body>
</html>
This is the result:

Things to note:
- You can have more that one <ng-model> tag in your code.
- The text inputs have an initial value of 0 (<ng-init>).
- You can embed arithmetic inside curly braces.
Separation of concerns
A general good practice in programming is Separation of concerns. The basic idea behind is to segregate responsibilities between modules/actor/components/... and do not mix them in the same module/actor/component.
The MVC design pattern is a particular case of separation of concerns. Three different concerns are defined:
- Model: All data and any logic to manipulate it (typically: create, retrieve, update and delete operations).
- View: Anything related with the visualization of the data retreived from the model. Any change in the Model will refresh the View.
- Controller: This connects interactions with the View into changes in the Model.
In the case of a Web application:
MVC with AngularJS
Let's Angularize our previous example.

First, let's say that we want an AngularJS application
<html lang="en" ng-app="app">
Second, let's add the dependencies:
<script src="{path}/node_modules/jquery/dist/jquery.js"></script>
<script src="{path}/node_modules/angular/angular.js"></script>
Third let's inject the controller:
<body ng-controller="MyController as myController">
Now let's link data from the controller into our view:
<div class="container">
    <div class="starter-template">
        <h1>Table populated with AngularJS controller</h1>
        <table class="table table-hover">
            <thead>
                <tr><td><strong>Name</strong></td><td><strong>Surname</strong></td></tr>
            </thead>
            <tbody>
                <tr ng-repeat="person in people">
                    <td>{{person.name}}</td>
                    <td>{{person.surname}}</td>
                    <td><button type="button" class="btn btn-info" data-toggle="modal"
                      data-target="#myModal" ng-click="currentPerson($index)">Info</button></td>
                </tr>
            </tbody>
        </table>
    </div>
</div>
The javascript controller code:
angular.module("app", [])
    .controller("MyController", function($scope) {
        $scope.people = [
            {
                name:"Oscar",
                surname:"Belmonte"
            },
            {
                name:"María del Carmen",
                surname:"Erdozain"
            },....
        ];
      });
The modal window:
<div class="modal fade" id="myModal" tabindex="-1" role="dialog" aria-labelledby="myModalLabel">
<div class="modal-dialog" role="document">
<div class="modal-content">
<div class="modal-header">
<button type="button" class="close" data-dismiss="modal" aria-label="Close"><span aria-hidden="true">×</span></button>
<h4 class="modal-title" id="myModalLabel">Info</h4>
</div>
<div class="modal-body">
<p>Detailed info about the person goes here.</p>
<p>Name: {{current_person.name}} Surname: {{current_person.surname}}</p>
</div>
<div class="modal-footer">
<button type="button" class="btn btn-default" data-dismiss="modal">Close</button>
</div>
</div>
</div>
</div>
The javascript code in the controller to update the current person:
$scope.currentPerson = function (index) {
    $scope.current_person = $scope.people[index];
}
Note the $scope variable. This means global scope, anything you put in the $scope variable will be accessible from your html code.
Summary
We have seen a step by step tutorial on how to Angularize our javascript Web applications.
The benefit of using AngularJS is we can independently build each part of our Web application.
We have seen how to build the GUI using HTML and how to bind the data to that provided by a Controller.
In the second part of the course, we will see how to provide the data to our controller by means of a server application.
Exercises
- Extend the adding example to include other arithmetic operations.
- Code and AngularJS to convert Celsius grades to the Fahrenheit and Reamur scales.
- Code an AngularJS application that shows the content of an input text reversed. Tip: use the ng-change directive in the input element to be notified anytime its content changes.